Showing posts with label Crafts. Show all posts

Sunday, January 23, 2022

WINTER BLUES PARTY...

 Here we are again in the dead of winter with more weeks of cold ahead of us than behind us!  I don't know about you, but this time of year is a bit of a struggle for me.  Too many gloomy or cold days and I find myself dragging.  Thankfully, I've been distracted because it was my turn to host a monthly event with my Heartfelt group!  It gave me the motivation to get all Christmas decorations put away and my home ready to entertain again!

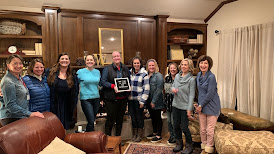
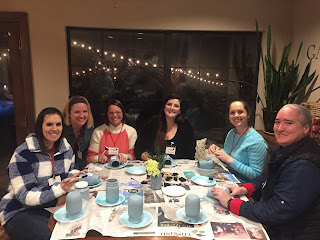
 I decided on a WINTER BLUES theme, making it a positive thing with blue and snowflake decor!  I already had a lot of blue things so that helped. I requested that the guests wear blue to the party and be prepared to share a tip with everyone on what helps them avoid the winter blues.  We had comfort food (chicken pot pie, roasted sweet potatoes, salad and apple crisp with ice cream.  We had a craft as well, snowflake mason jar vases.  We had so much fun, even though the temperature was 20 degrees outside. 


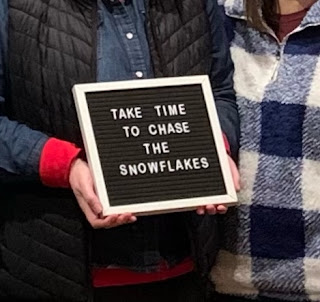
A fun sign for winter!

Group photo

Making snowflake mason jar vases!

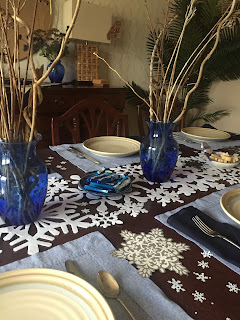
My dishes have a blue stripe and I already had the light denim placemats, in addition to the navy napkins.  I also have several pieces of blue glass from my mother.  
I gathered natural branches to put in my vases and they do look like winter!

I found the snowflake runner, confetti and decorations 
on clearance at Party City!

 
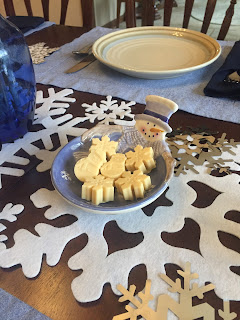
I found two snowman dishes at the local thrift store!  
They were perfect to hold molded snowflake candies!


I think next winter I will hold another WINTER BLUES party now that I have all the cute things!  


Monday, December 27, 2021

CHRISTMAS CRAFTING AND FAVORITE SPOTS IN MY HOME...

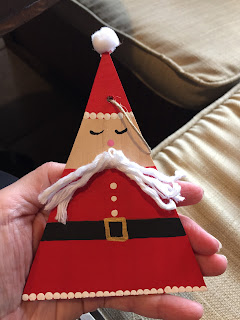
 This year we weren't doing Christmas with our kids until January 2, so I was a little slow to get motivated to make things!  I did make a couple of batches of gingerbread cookies and a cookie bowl as well.  I have made these since the kids were small but hadn't done it in a while.  I decided to test my skills again...  Finally on December 23 I got busy with the saw and paint after being inspired by a cute Santa I saw in a store...so here they are!

You shape the gingerbread dough over a foil wrapped bowl and bake.

Cooled and ready to fill with goodies!

I always cut out tiny holes with a cookie cutter before baking so I can thread pretty ribbon through it.

So cute!  I usually fill it with some other goodies as well and wrap it in cellophane paper.

Now on to wood crafting...I had some thin wood and cut it into triangles with DH's help.  He also drilled the holes.

I had fun painting them into Santas!  

No wrapping required

Next, a few of my favorite scenes in my home right now!

The tree, complete with an old wagon, toy car, and teddy bear.

My mantle this year

Entry

My kitchen tree

Merry Christmas to you and yours!


Thursday, December 2, 2021

STEPPING STONE CRAFT...

 I thought it was a shame to let our old pool tile go to waste when our pool was being remodeled this summer, so before they took the debris away, I scooped a couple of buckets of it.  I have always wanted to try making a mosaic type stepping stone so here was my chance.  There are lot of tutorials on Pinterest.  I tried this one and this one.  The first turned out the best for me.  For the molds I bought a plastic mold at Hobby Lobby and also got an old piece of Tupperware at a garage sale for $.50 that works great!

my molds


with texture lines

After cleaning up some of the tile pieces with muriatic acid (carefully!) and breaking off bits of the white mortar with pliers, I sorted all the pieces and laid out a few designs. The Hubs helped me mix the sand mortar to the right consistency (pancake dough) and then I quickly set in my broken tiles, piece by piece, tapping the sides to let the air  bubbles out of the cement.  It's always fun to pop out the finished product 2 days later.  Some looked a little rough in the middle so after some experience I made some stepping stones with texture lines to look that way on purpose. 


this one was the one where I put the pieces in upside down before the concrete pour - didn't work so wel

I'm planning on giving them away for Christmas to my family - we have a tradition with homemade gifts!  These cost me less than $20 and were a lot of fun.

Tuesday, November 2, 2021

FEELING GROUPY...

 Looking for fun and feeling GROUPY!  :)

Sorry, that song popped into my mind just as I started this post!  We've committed to several new things lately, all small groups.  So all of a sudden The Hubs and I have a busy life again!  But we're excited about it.  We had gotten a little lazy with all the Covid precautions.

One group we started is a Q group (small group meeting) with some other families in our Bible class at church.  We have been meeting every Sunday evening at our home and so far, it's been really good.  We've had one dinner together and also had a fun "service" project - decorating a car for our church's Trunk or Treat and passing out candy to the little ones!  We had a lot of fun with a Jonah and the Whale theme.  

The Hubs and I were jellyfish!

Another group that I'm in is a new program for women at church called Heartfelt.  It is a mentoring-type group with several older women (ahem, that would be me) and several younger women.  We meet once a month, in one of the homes, and the older women serve dinner, have a devotional, and teach a skill or do some type of craft with the younger.  In September we met in my home and I showed them how I divide my aloe vera plants and re-pot them.  They all got to take home an aloe vera baby.  In October we made toilet roll pumpkins.  They sound funny but they're really easy and cute!

Toilet paper roll, batting, a fabric napkin,cinnamon sticks, and fake leaves...
What do you think of our pumpkins?

Finally, we started meeting with friends playing games once a month.  This month their kids had come for a visit from TN so we extended the invite to any of our kids that could come.  It feels good to have some fun things to do and look forward to...even though I'm an introvert.  I need organized things like this to get me out and have some things to do!  

Playing Fish bowl with long-time friends

How about you?  Have you returned to activities?  Do you like structured times of activity with others or are you more of a spur-of-the-moment kind of person?  I'm sure there's an Enneagram number for this but I'm not into all that.  :)


Tuesday, February 26, 2019

A SOLUTION FOR LABELING CM ALBUMS...

For years, I have not been satisfied with how to label my Creative Memories photo albums. The labels I made would curl and peel off.  Why do you need a label at all?  Well, when you have 20+ you want to be able to see them at a glance and know what year it is or if it's a family or vacation album.  I perused the internet for a while and got inspired!  Here's my solution:
New label I made

Old labels curling off


How to make your own:

I used a Dymo label maker, white tape refill, vellum, and a paper cutter.
Print out whatever you want your label to say.
You could also write your own on a white sticky address label.
Cut vellum into strips 1-2 inches wide and 8 inches long.
Mount the label in the very middle of the strip.
Put another vellum strip right on top of the other one.
You do need to do this to protect the label from curling off.  
Now slide the end of the strips down into the sides of the album.
All done!  Look how nice and neat it looks!


Problem solved!

Wednesday, December 12, 2018

HOW TO FIT 20 YEARS OF PHOTOS INTO 1 ALBUM...


For many years I enjoyed scrapbooking.  My Mother made both my sister and me a simple one that I added to as I was growing up.  I loved pictures and mementos!  One of my favorite things to do when I would go to my Grandmommie's house was to get her photo album from Hawaii and look through it.  It was like a different world to me.  Seeing her in a muu-muu, getting a kiss from Don Ho, seeing hula girls - it was all very eye opening.  She brought all her grandchildren many gifts when she came home from the trip as well.  My mother started both my sister and me a scrapbook with our school class pictures and I added to that.  As a teen I made my own scrapbook out of wallpaper. Later in high school, I was on the yearbook staff.  I learned more about layouts and editing and throughly enjoyed it.  It reenforced my love of scrapbooking.

When I became a mother in 1989, of course portaits and photos were important to me.  I took as many as I could afford with my little Kodak Instamatic.  Then came DOUBLE PRINTS.  Hallelujah!  You could pay just $1 more and get two of every print. Thus began our problem with storage.

Long story short, I got double prints of every roll of film for about 20 years!  My justification was that Grandmas wanted some of the pictures and I would also make albums for the kids after making my own.  God forbid my kids ever forget any moment of any experience we provided for them!!!
So here I am, years later, with all my kids in their 20's.  I've never made them that album.  I quit making myself albums around 2008.  (I actually did make each child a special themed album for their 16th birthday) Everything was going digital and it didn't seem practical to get prints anymore.

With all the decluttering I've been doing the last three years, I kept avoiding the "SCRAPBOOKING ROOM."  Why?  You know why.  It means I have to get all those double prints out and make the books or give them to the kids in a big mess or toss them (which I could never do).  As life got busier, all those precious memories had become a burden to me, and so I determined I would get those memories in albums.  This year, 2018 was going to be the YEAR TO GET IT DONE.

When I first started back in January, I had no idea how I would go about it, but after fumbling around for a while, I developed a system.  I have three children, so the goal was to make three albums.  I came up with some rules:

1.  Use only the BEST photos.  Throw away any blurry or bad ones.

2.  MAKE JUST ONE ALBUM.  Do we really want to burden our children with a library of albums?  I had a 50 page album for each child.  That means, there will be a few pages of baby days, a few of school days, a few of family, a few of holidays, sports, performances, and vacations.  You can see how this will help you choose only the best photos.

3.  SORT by child first.  This part went relatively fast!  Look through pictures, noticing which child was prominent in each photo.  So, for instance, vacation photos from 2005 involved an epic road trip to California.  After sorting through them, I had four piles: Vacation pics for Child #1, Child #2, Child #3, Extras.  Store the pictures for Child #2 and #3 in other boxes for their albums to be done later.

4.  SORT by events and seasons second.  For example, I got all of Child #1 pictures sorted into the following categories:  Toddler, Family, Birthdays, Spring, Summer, Fall, Winter, School days, Sports, Music, Performances, Friends, and Vacations.  (The seasons included holidays)

5.  THINK AHEAD.  I looked at what I had and determined about how many pages to dedicate to each category to make it work for a 50 page album.

6.  FORGET DATES.  I think one reason I avoided this so long is because I thought I had to write dates on each page.  I basically did a book based on the seasons, starting with spring.  Spring had 4 pages of Easter time through the years.  Plus a page about LTC.  Then came summer.  I did a big collage of misc. summer pictures, then had 2 pages of swimming pool times, 2 of lake times, 2 of Fourth of July celebrations.  When you do this, you find that most of the pictures you took were pretty meaningless and it helps you choose the best photos.

7. DECORATE (a little).  How you do each page is entirely up to you but my system was to do basic pages with a little cropping of photos to try to get more on the page, maybe some colored paper, and sometimes a sticker or die cut to add some embellishment.  Occasionally I did a more intricate layout if the pictures lend themselves to it. But in the words of my friend Delise, a CM Consultant, just "get it done!"  A done album is better than no album.

8.  BE PREPARED for some emotional fatigue!  Going through these reenforced the fact that I'm getting older and my babies are grown up!  I had to take breaks - it was hard to choose between all the Kodak moments. In some cases it was easy, though.  I realized that year my child played baseball that it didn't turn out to be his thing and so 1 or 2 pictures of that was plenty.  It was a bittersweet process!

9.  FINAL TOUCHES.  After getting the album basically done, I went back through, page by page and noticed where I might add some embellishment.  I also put titles on many of the pages, some with letter stickers and some in my own handwriting.  I was torn on whether to journal for them or let them fill it in with their memories.  You can decide.

10.  GET OVER THE IMPERFECTION.  I realized I didn't have as many pictures of a certain child on this or that and I couldn't find hardly any graduation pictures of one!  Also, as I moved on to do albums for Child #2 and #3, I didn't realize it, but my style changed.  I did more collage type pages and that is just fine. Anyway, I didn't worry about it.  Remember, just get it on the page!

Maybe they won't appreciate it, but my mind is feeling good and a burden is lifted.  I'm glad I was able to put them together, and the rest of the pictures?  They will go in a box for each child.  I just can't throw them away!  But there's not nearly as many anymore and they are sorted.

Now I'm wondering if I could be a Scrapbooker for hire!

:)


Wednesday, February 28, 2018

WHAT ICE STORMS ARE GOOD FOR...

I've been tackling a major project lately.  Just the thing to do when the weather keeps you inside!  Approximately 25 years of double print pictures that I've been intending to sort and make into albums for a while are finally getting sorted into three piles, one per kid...
(this is just a small representation of the mess ;))

It's kind of crazy when you think about the change in photography/prints the last 20 years.  As I developed pictures, I got double prints to do the kid's albums LATER.  I made family and vacation albums for a long time, but I've switched to Shutterfly the last ten years.  But even though I'm not as crazy about scrapbooking as I once was, it would be a real shame to just toss all these memories.  I think hope my kids will appreciate them.

Do you have piles like mine?  I have a new plan to get me through them, and I'm really excited about it.  Maybe by putting it in print, it will encourage me to actually get it done.  It's been nagging at me for a while.  Like, years!  Here's my Declutter/Make Albums plan:
  • Forget exact dates/years of each picture.  Although many have the date on the back, for these albums it won't be important.  Sort into categories: Baby, Preschool, School, Easter, Halloween, Christmas, different seasons, birthday, sports, performances, vacations, etc.
  • Have 2-4 pages for each category, then move on.
  • Choose only the best of the best pictures.  More is not necessarily better!
  • Hit it hard right now while life is kinda slow and the weather is cold.
  • Plan to work hard on it when The Hubs is out of town and I can make a mess.
  • Think about the joy on their faces when they receive the albums this Christmas!
  • Think about the joy I will feel to have this mess gone through and my motherly duty as keeper of the memories completed!  LOL


Anyway, I'm tackling it and hopefully each of my kids will wind up with an album of memories.  Blogging may take a back seat for a while...


Tuesday, January 2, 2018

HOME MADE CHRISTMAS GIFTS...

This year I wanted to do something with maps.  For one reason, we have several that are leftover from vacations that I felt I would never use again!  I also wanted to do something with our state shape because I love the t-shirts and other things I have seen like this.  So here's what I came up with:

 State blocks - really easy when you have leftover wood pieces.  I sanded the edges, used spray adhesive to glue the state shape onto the block, then added a little heart sticker to indicate the area where our relatives live.  
 I also made these Santa ornaments from some seed pods in our yard - painted them, and added a jute loop with hot glue.  I collected the pods in late summer.
These pencil cups are for those in our family who don't live in OK - just made from cans, spray adhesived the map strips, then also did a 2 inch strip inside the can.  

I didn't get a good picture of the homemade gifts from the extended family - we didn't have a big get-together this year but I will tell you the other gifts were Home-made spaghetti sauce in a jar, a little tree made with musical note-paper, and a garland.

Now for the Grand Finale!
My kids (and their spouses) made me a beautiful gift!  They recorded a few songs on a CD!  My daughter-in-law did the artwork - a watercolor snowflake!  Love hearing their beautiful voices whenever I want.  


Tuesday, July 4, 2017

GARDEN PLAY...

Play is good for you no matter your age!  Way back in college I learned in early childhood education that play is essential for children.  It's how they learn.  A few days ago I decided it was time to play.  I took a much needed morning off from my phone, emails and other ministry related items.  
 I cleaned out my vegetable garden of these flowers that were taking over and have been enjoying this little arrangement from the "trash" of the garden.  I needed a heavy vase so the wind wouldn't tip it over so I repurposed a candle holder.
This door to nowhere has been here in the wild part of our yard and I wanted to embellish it so I added these English ivy vines I saved when we took down a large tree.  The vines were over 17 years old and had taken over.  They were kind of cool looking though, the way they had woven together, so I played around and at my daughter's suggestion, made these "blinds" for the window.

I put these in a pot for this little plant to climb up on. Upon?  Eh, not worrying about it.

What do you do in your playtime?

Monday, January 30, 2017

UPCYCLE A CANVAS PAINTING...


I have to admit that our bedroom is probably the last place I think about, as far as decor.  But after we got a new bathroom floor, I promptly moved on to our adjoining bedroom to declutter and do a little sprucing up!  Feng shui says your bedroom should be a place of calm (without a bunch of junk in it).  I believe that in theory!  But never really practiced it.  It became a dumping ground for old decor.  I am going for a simpler look and life, so I removed a chair, some throw pillows laying around and lots of knick-knacks.  Then there was this really large, faded picture on the mantle.  I decided to see what I could do to update it.

 I decided to make it into a burlap sign.  I popped the canvas out of the frame and stapled a piece of burlap onto it.  Then I found a saying I liked.  I had to read a few things on Pinterest since it had been so long since I painted letters on burlap, but I ended up printing the letters off from a large font on the computer, then just placing them underneath the burlap where I could see them slightly.  Then just tried to paint with a steady hand.  It's not perfect, but it's something fresh for our bedroom!